Sunday, October 10, 2010

Integarting BAM with BPEL in SOA Suite 11g

 Hi Friends... In this box we will discuss how to integrate BAM and BPEL with a sample and simple example.
To do this we have to have SOA suite installed along with BAM.(And as usual JDev is required to do the design time development.)

We have two methods to integrate these two. One is with the help of BAM adapter and second one is through sensors.

First we will see the first approach.(with BAM adapter)

Start the Admin server, Managed server and BAM server before starting the development.
Now login to the BAM console.


Here we will see the BAM home page as below. Click on Active Viewer


Now create a data object by clicking on createdataObject link.


Provide the dataObject name and then click on add fields to add elements to the dataObject.


Now finish the creation of dataobject by clicking on createDataObject button.

In JDeveloper create a SOA project (with BPEL component and BPEL can be any type)
Open the composite.xml and drag the BAM adapter to the left swim plane.


Give appropriate name to the service. If you have already a connection to BAM server it will show that one otherwise create new connection by providing BAMserver deatils.
If we expand that connection, we can see the dataObject that we have created in BAMConsole in the previous steps as below.


Select the dataObject and select the operation (for our sample select insert) and NEXT


Now we are in JNDI Name page of configuration wizard. Here we have to provide the JNDI name that is configured in Weblogic Administartion console.


If it is not configured follow the below steps.
Open the administration console by providing the credentials.
Now select the  Deployments and then navigate to Oracle BAM Adapter by clicking next below the Deployments table.


Select configuration and then Outbound Connection pools. Now expand SOAPConnection factory and click on eis/bam/soap


Now it will open below page. Here provide the BAM server details. In the boxes after entering values we have to click enter explicitly.


After entering all values save the changes. After saving the changes we have to redeploy the BAMAdapter which it will show as below.


Now again come to deployments and then Oracle BAM Adapter. Select the checkbox corresponds to Oracle BAM Adapter, which will enables the update button above the table.


Click on the update button then select the redeploy radio button. If we are doing this first time for BAM adapter it will ask us to create Plan.xml. Give the appropriate name and finish the redeployment.

If we click on Oracle BAM adapter and then on General tab it will show a page as below. Make sure that you are providing the same JNDI name while configuring in JDeveloper.


Now in Jdeveloper finish the configuration of BAM adapter and assign required values to the input variable of BAM adapter invoke variable. After completion of these things our BPEL looks like below.


Like other adapters we will get one wsdl, one jca file and one xsd file for this adapter.

Now deploy the composite application and provide the inputs in the em page.


Now open the BAM console and select the dataobject in dataObject pane.


Now click on the contents link in the center area of the page.


We can see the the details as below.


This is the end of first method.

Now we will see the second approach.

In this methode first we have to create sensors and have to create BAM sensor action through which we interact with BAM.

To create sensors see this post.
After creating sensors create BAM sensor action as below.
In structure pane right click sensor actions then create and now select BAMSensor action.


Give name to the action and select the sensor in the dropdown list.
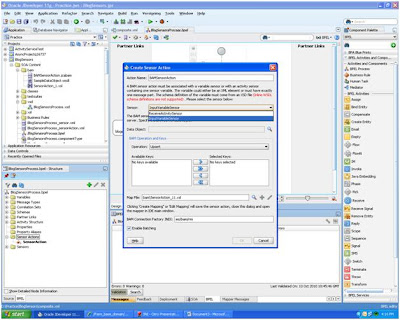


Now by clicking on the torch beside the data object select the object we have created in BAM console earlier.


Select the operation in the dropdown list and double click on each variable present in available key box to make them available. If we want we can change the XSL name otherwise accept the default. In Connection factory JNDI provide the JNDI name we configured above.(as shown in below image). Finish the BAM action creation


It will open XSL we mentioned while configuration. Map the elements as required. In the source side it will give standard structure from the XSD and in target side we will have elements that dataObject contains.


Deploy the composite application and see the results in BAM console.


Regards


PavanKumar.M.V.S.S.S..S

Sensors in SOA 11g

Hi All... in this topic we will see how can we define sensors and in how many ways we can use these sensors for different purposes.
We can create three types of sensors in BPEL.

1) Variable sensors ----Variable sensors are used to monitor variables(or parts of a variable) of a BPELprocess.

2) Fault sensors ---- Fault sensors are used to monitor BPEL faults.

3) Activity sensors ----Activity sensors are used to monitor the execution of activities within a BPEL process.

Once we create a sensor we can associate an action to it. When a sensor is triggered by Oracle BPEL Process Manager, a new sensor value for that sensor is created. After that, all the sensor actions associated with that sensor are performed. A sensor action typically persists the sensor value in a database or sends the normalized sensor value data to a JMS queue or topic. For integration with Oracle Business Activity Monitoring, the sensor value can sent to the BAM adapter.

When we create a sensor we will get below files
bpel_process_name_sensor.xml --- defines the sensor definitions of a BPEL process.


bpel_process_name_sensorAction.xml --- defines the sensor action definitions of a BPEL process.

Using sensors in BPEL:

Create a soa project with BPEL as component (can be any template empty, sync or async)
We will create variable, activity, fault sensors in order respectively.
Now open the bpel process and go to structure window, right click variablesensor and select create variable sensor as below.


Give a proper name to sensor and select the variable to which you want to create a sensor and finish the creation.
 

Now right click activity sensor and select create activity sensor as below.


Give a proper name to sensor and select the activity to which you want to create a sensor and finish the creation.


To create fault sensor right click fault and select create. Now provide the name and select the fault for which we want to create. (In this example we are going with selection failure) as below.


Now we are done with creation of sensors and we are about to create sensor actions.
For this right click sensor actins and select create and then sensor action.


Here give some name and select the publish type as Database.(we have other options, in this sample we are going with database. Infact in BPEL console we will see the sensors with action -publish type as database.)

Database: Publishes the sensor data to the reports schema in the database. The sensor data can then be queried using SQL.
JMS Queue: Publishes the sensor data to a JMS queue.
JMS Topic: Publishes sensor data to JMS topic.
Custom: Publishes the data to custom Java class.
JMS Adapter: Publishes to remote queues or topics. (Above JMS Queue and JMS Topic publish types only publishes to local JMS destinations)


Now in edit all the sensors we have cretaed above and select the sensor action thatwe created now as below.


To get the selection failure for fault sensor we are creating an assign activity as below.


Now deploy the composite application and initiate it from em page.


It will get faulted because of our assign activity.


Now open the instance and go to sensor values tab.


In sensor values page we can see the sensors for variable, activity and fault sensors with the values like in below pics.


Till now we have seen sensors in BPEL.

Along with the BPEL sensors we have one more sensors called COMPOSITE sensors which we create in composite.xml. We will see these sensors in coming post in detail.

Regards

PavanKumar.M.V.S.S.S.S
 

Monday, September 27, 2010

Adding and removing files To and from MDS in SOA 11g

In this post we will see how can we add and remove files to MDS through ant script files.
First we have to create folder structure in ${wn.bea.home}\jdeveloper\integration\seed\soa [Ex: apps\PavanFolder1\PavanFolder2\ABC.wsdl]

${wn.bea.home}\jdeveloper\integration\seed\soa folder is the home folder for MDS repository.
By default we will see configuration and shared folder here.

Now create a folder with name (any location our wish) PavanFolder1 and place properties file, build.xml and .cmd file in this folder.

Now we have to give mds.applications value as PavanFolder1.

build.properties file:

# global
wn.bea.home=D:\Jdeveloper1113
oracle.home=${wn.bea.home}/jdeveloper
java.passed.home=${wn.bea.home}/jdk160_18
wl_home=${wn.bea.home}/wlserver_10.3
# temp
tmp.output.dir=c:/temp
mds.reposistory=D:/Jdeveloper1113/jdeveloper/integration/seed/soa/apps/
mds.applications=PavanFolder1
mds.undeploy=true
deployment.plan.environment=dev
# dev deployment server weblogic
dev.serverURL=http://localhost:8001
dev.overwrite=true
dev.user=weblogic
dev.password=welcome1
dev.forceDefault=true
# acceptance deployment server weblogic
acc.serverURL=http://localhost:8001
acc.overwrite=true
acc.user=weblogic
acc.password=welcome1
acc.forceDefault=true

build.xml file:

<?xml version="1.0" encoding="iso-8859-1"?>
<project name="soaDeployAll" default="deployMDS">
    <echo>basedir ${basedir}</echo>
    <property environment="env"/>
    <echo>current folder ${env.CURRENT_FOLDER}</echo>
    <property file="${env.CURRENT_FOLDER}/build.properties"/> 
    <taskdef resource="net/sf/antcontrib/antcontrib.properties"/>
    <target name="unDeployMDS">
        <echo>undeploy MDS</echo>
        <foreach list="${mds.applications}" param="mds.application" target="undeployMDSApplication" inheritall="true" inheritrefs="false"/>
    </target>
    <target name="deployMDS">
        <echo>undeploy and deploy MDS</echo>
        <if>
          <equals arg1="${mds.undeploy}" arg2="true"/>
          <then>
            <foreach list="${mds.applications}" param="mds.application" target="undeployMDSApplication" inheritall="true" inheritrefs="false"/>
          </then>
        </if>
        <foreach list="${mds.applications}" param="mds.application" target="deployMDSApplication" inheritall="true" inheritrefs="false"/>
    </target>
    <target name="deployMDSApplication">
        <echo>deploy MDS application ${mds.application}</echo>
        <echo>Directory ${mds.reposistory}</echo>
        <echo>remove and create local MDS temp</echo>
        <property name="mds.deploy.dir" value="${tmp.output.dir}/${mds.application}"/>
   
        <delete dir="${mds.deploy.dir}"/>
        <mkdir dir="${mds.deploy.dir}"/>
        <echo>create zip from file MDS store </echo>
      <zip destfile="${mds.deploy.dir}/${mds.application}_mds.jar" compress="false">
        <fileset dir="${mds.reposistory}" includes="**"/>
      </zip>
        <echo>create zip with MDS jar</echo>
      <zip destfile="${mds.deploy.dir}/${mds.application}_mds.zip" compress="false">
        <fileset dir="${mds.deploy.dir}" includes="*.jar"/>
      </zip>
        <propertycopy name="deploy.serverURL"    from="${deployment.plan.environment}.serverURL"/>
        <propertycopy name="deploy.overwrite"    from="${deployment.plan.environment}.overwrite"/>
        <propertycopy name="deploy.user"         from="${deployment.plan.environment}.user"/>
        <propertycopy name="deploy.password"     from="${deployment.plan.environment}.password"/>
        <propertycopy name="deploy.forceDefault" from="${deployment.plan.environment}.forceDefault"/>
        <echo>deploy MDS app</echo>
        <echo>deploy on ${deploy.serverURL} with user ${deploy.user}</echo>
        <echo>deploy sarFile ${mds.deploy.dir}/${mds.application}_mds.zip</echo>
        <echo>Oracle Home: ${oracle.home}</echo>
        <ant antfile="D:/Jdeveloper1113/jdeveloper/bin/ant-sca-deploy.xml" inheritAll="false" target="deploy">
             <property name="wl_home" value="${wl_home}"/>
           <!--  <property name="oracle.home" value="${oracle.home}"/>-->
             <property name="serverURL" value="${deploy.serverURL}"/>
             <property name="user" value="${deploy.user}"/>
             <property name="password" value="${deploy.password}"/>
             <property name="overwrite" value="${deploy.overwrite}"/>
             <property name="forceDefault" value="${deploy.forceDefault}"/>
             <property name="sarLocation" value="${mds.deploy.dir}/${mds.application}_mds.zip"/>
        </ant>
    </target>
    <target name="undeployMDSApplication">
        <echo>undeploy MDS application ${mds.application}</echo>
       <propertycopy name="deploy.serverURL"    from="${deployment.plan.environment}.serverURL"/>
        <propertycopy name="deploy.overwrite"    from="${deployment.plan.environment}.overwrite"/>
        <propertycopy name="deploy.user"         from="${deployment.plan.environment}.user"/>
        <propertycopy name="deploy.password"     from="${deployment.plan.environment}.password"/>
        <propertycopy name="deploy.forceDefault" from="${deployment.plan.environment}.forceDefault"/>
         <echo>undeploy MDS app folder apps/${mds.application} </echo>
         <ant antfile="D:/Jdeveloper1113/jdeveloper/bin/ant-sca-deploy.xml" inheritAll="false" target="removeSharedData">
              <property name="wl_home" value="${wl_home}"/>
           <!--   <property name="oracle.home" value="${oracle.home}"/>-->
              <property name="serverURL" value="${deploy.serverURL}"/>
              <property name="user" value="${deploy.user}"/>
              <property name="password" value="${deploy.password}"/>
              <property name="folderName" value="${mds.application}"/>
         </ant>
    </target>
</project>

deployMDS.cmd:

set ORACLE_HOME=D:\Jdeveloper1113
set ANT_HOME=%ORACLE_HOME%\jdeveloper\ant
set PATH=%ANT_HOME%\bin;%PATH%
set JAVA_HOME=%ORACLE_HOME%\jdk160_18
set CURRENT_FOLDER=%CD%
ant -f build.xml deployMDS


Now run this deployMDS.cmd.

Create a MDS connection in Jdev and now we can see apps folder along with configuration and shared folders, and the structure we have created in apps folder.

We can access the files we have placed in MDS in BPEL. We will see this in coming posts.


Regrads,
PavanKumar.M.V.S.S.S.S.

Sunday, September 26, 2010

Fault-policy frame work in SOA 11g

In this post we will discuss the fault-policy framework in SOA 11g.
Conceptual wise no changes in this release when compare to 10g. But some changes are there in placing these files and etc.

First of all this framework will work only for the faults at invoke activity.
To implement fault-policy framework we have to have two xml files called fault-bindings.xml and fault-policies.xml.

A fault policy bindings file associates the policies defined in a fault policy file with the SOA composite application or the component.

A fault policy file defines fault conditions and their corresponding fault recovery actions. Each fault condition specifies a particular fault or group of faults, which it attempts to handle, and the corresponding action for it.
And these files should be created based on below XML schema.

http://download.oracle.com/docs/cd/E12839_01/integration.1111/e10224/med_faulthandling.htm#BABJGAEI

We can have these xml files in the same directory as the composite.xml file of the SOA composite application or we can place it in a different location and access those by using below properties in composite.xml

oracle.composite.faultPolicyFile
oracle.composite.faultBindingFile

Ex:
<property name="oracle.composite.faultPolicyFile">oramds:/apps/components/faultpolicies/fault-Policies.xml
</property>
<property
name="oracle.composite.faultBindingFile">oramds://apps/components/faultpolicyfiles/fault-bindings.xml
</property>
Below diagram shows how BPEL process behaves when we use fault-policy frame-work.

So when we are using this framework, it takes precedence over catch and catchAll blocks in BPEL.
 
Below are the sample fault-policies and fault-bindings.xml

fault-policies.xml :

<?xml version="1.0" encoding="UTF-8"?>
<faultPolicies xmlns="http://schemas.oracle.com/bpel/faultpolicy"
xmlns:bpelx="http://schemas.oracle.com/bpel/extension"
xmlns:xsi="http://www.w3.org/2001/XMLSchema-instance"
<faultPolicy version="2.0.1" id="PannPolicy1">
<Conditions>
<faultName xmlns:bpelx="http://schemas.oracle.com/bpel/extension" name="bpelx:remoteFault">
<condition>
<action ref="ora-terminate"/>
</condition>
</faultName>
<faultName xmlns:bpelx="http://schemas.oracle.com/bpel/extension" name="bpelx:bindingFault">
<condition>
<action ref="ora-retry"/>
</condition>
<condition>
<action ref="ora-human-intervention"/>
</condition>
</faultName>
</Conditions>
<Actions>
<Action id="ora-terminate">
<abort/>
</Action>
<Action id="ora-retry">
<retry>
<retryCount>2</retryCount>
<retryInterval>2</retryInterval>
<exponentialBackoff/>
</retry>
</Action>
<Action id="ora-human-intervention">
<humanIntervention/>
</Action>
</Actions>
</faultPolicy>
</faultPolicies>

 fault-bindings.xml:

<?xml version="1.0" encoding="UTF-8"?>
<faultPolicyBindings version="2.0.1" xmlns="http://schemas.oracle.com/bpel/faultpolicy"

<composite faultPolicy=" PannPolicy 1"/>
<component faultPolicy=" PannPolicy 1 ">
<name>TestProcess</name>
</component>
<component faultPolicy=" PannPolicy 1 ">
<name>SecondProcess</name>
</component>
</faultPolicyBindings>

Infault-policies.xml condition section, we can have actions based on the evaluation of fault-variable available on the fault. Like below.

<condition>
<test>$fault.code="ABC Error"</test>
<action ref="ora-terminate"/>
</condition>

Some predefind actions were provided by oracle are:

retry
human-intervention
replay
rethrow
terminate
javaAction

We will see how to use custom java code in fault-policy framework in coming posts.

Regards

PavanKumar.M.V.S.S.S.S.

Wednesday, September 22, 2010

Creating domains in SOA11g

In SOA-10g we have domains concept in BPEL PM.

Now ORACLE has reintroduced this feature in SOA 11g PS2.


But in SOA Suite 11g we are calling these as partitions as weblogic server has the concept of domains.

Here are the steps to create partitions


1) Login to enterprise manager

2) Select soa-infra under SOA folder.

3) Click the drop-down ( SOA Infrastructure) under soa-infra.

4) Select Partitions and click on create.

5) Give the name and finish it.


Regards

PavanKumar.M.V.S.S.S.S.

Creating JMS Queue and Posting messages to it from SOA 11g

In this post first I am going to give the steps to create JMS queue in weblogic.

Pre requisites to do these.. You have to have weblogic server and SOA suite installed.

You can do this in existing JMSServer and JMSModule or fisrt you can create new JMSServer and then JMSModule in the created JMSServer.

We will see the second scenario here.(This covers first case also)

1) Login to weblogic administration console.
2) Navigate to Services-->Messaging-->JMSServers.
3) Now in JMS Servers table click New


4) Give the server name and persistent store.
5) Select the target server. (Generally SOA server) and finish.

Changes happened beacuse of JMSServer creation refelcts in config.xml ( D:\Jdeveloper1113\user_projects\domains\base_domain\config)


6) Now Navigate to Services-->Messaging-->JMSModules
7) Click on New in JMS Modules table.
8) Give the name and click on Next
9) Select the target and click on Next and in next page finish the creation of JMSModule.


10) You can see the created JMSModule in the JMSModule table as above and chages will be reflected in jmsmodulenamemodule-jms.xml [@ D:\Jdeveloper1113\user_projects\domains\base_domain\config\jms]
11) Now create Queue and connection factory by clicking on the created JMSModule.
12) Click new on Summary of Resources table.
13) Select Queue and then next
14) Now give the queue name and JNDI name and then to next page
15) Here if we are doing queue creation in existing module it will show us existing subdeployment. If we are doing in new one create new subdeployment, give some name and select the JMSSerevr finish the queue creation.

Here entries will be added to the same jmsmodulenamemodule-jms.xml

16) Now select connection factory after reaching the step 12 page and in next page give connection factory name and JNDI and finish the CF creation.

These entries also will be added to the same jmsmodulenamemodule-jms.xml

Now we are done with queue and connection factory creation


Now we have to redeploy JMSAdapter after configuring connection pools.

Select the Deployments (above Services) then in the table displayed select JMSAdapter
Now select configuration and then Outbound Connection Pools.


Now click on New button in Outbound Connection Pool Configuration Table and go to next page.
Here select the radio button (oracle.tip.adapter.jms.IJmsConnectionFactory) and next
Give the JNDI name and finish the process.(say eis/PavanQueue/PavanQueueCF)

At this point, it will ask us for the deployment plan location. Click on the path to the directory you created earlier and enter Plan.xml for the plan name. If we are doing this first time it will create new Plan.xml at the specified location.


If we oracle.tip.adapter.jms.IJmsConnectionFactory we can see the Pool we have created as above.
Select the one created now, then it will take us to a page where we can see Outbound Connection Properties table. In this table give the connection factory location (The one we have given in step 16 and click Enter and then save)

We have done with configuration of the connection pool, now we have to redeploy the JMSAdapter
Now again Come to Deployments (above Services) then in the table select JMSAdapter(not clicking the link, check the check box ).Now Update button will get enabled.
Click on Update and in next page check the redeploy button and finish the redeployment.

With these steps we are ready with the queues.

Now in BPEL while configuring the JMS adapter select the queue created in the server and give the location that we have provided while configuring Connection pool(eis/PavanQueue/PavanQueueCF)

Now deploy the the process and you can checkthe queue in monitor tab.(JMSModules-->YourJMSModule-->YourQueue-->Monitoring)


Regards
PavanKumar.M.V.S.S.S.S.